Custom Fonts: Add a Google Font to Your Site
CrowdFiber supports adding custom fonts to match your brand. This article covers using google fonts for the purpose but any font can be used as long as the server hosting the font is configured correctly.
Step 1: Gather the needed information
-
Go to https://fonts.google.com/, locate and select the desired font.
- A search bar at the top of the screen and a left-hand side panel for filters provides easy searchability.
-
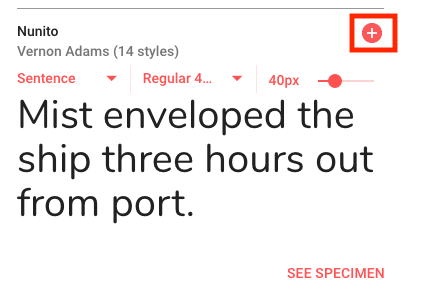
Select Get font to the right of the font name.
.png)
-
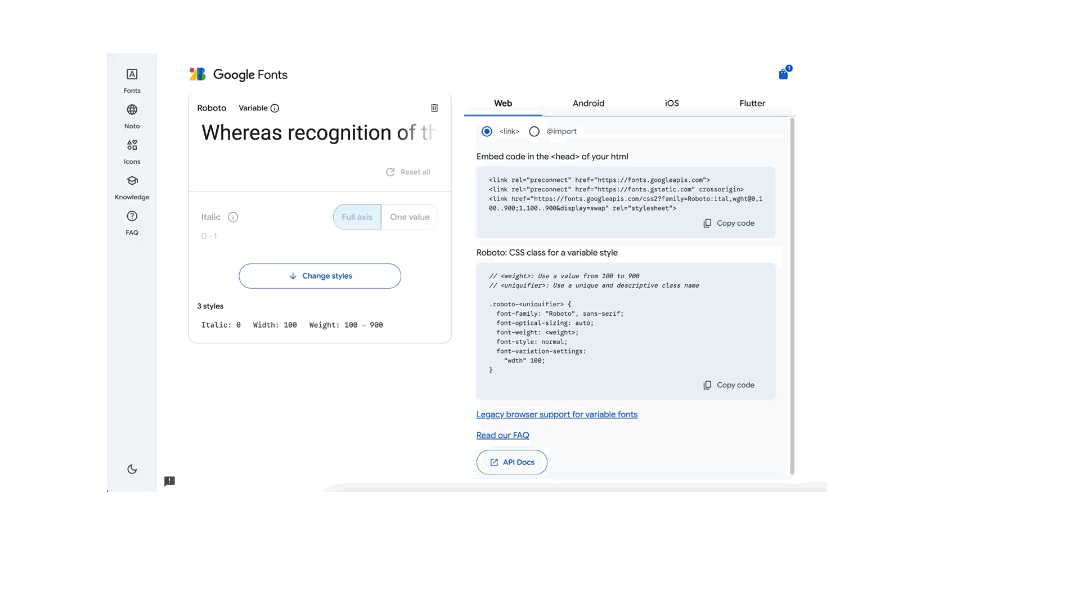
Select < > Get embed code on the top right of the page.
.png)
-
If you'd like to style your selected font, you may do so as shown below.
-
Select the @IMPORT tab and copy only the import statement from the example.
Paste this into a blank Notepad file or another text editor.
.png)
-
Select the font-family from below the import statement (shown above).
Paste it into the same text document.
Step 2: Prepare the custom CSS
This part is a bit technical, but we will walk you through step-by-step and provide an example. You will need to prepare a simple CSS statement to override the default provided by CrowdFiber.
Follow the steps below:
-
Place the following text at the top of the CSS file for tracking custom changes.
/ Customer Font Override /
-
Now place the import statement from Google on the next line. Do not modify this line in any way.
@import url('https://fonts.googleapis.com/css2?family=Roboto:ital,wdth,wght@0,98.9,100..900;1,98.9,100..900&display=swap');
-
Next, write a simple statement to target the elements within CrowdFiber. We will need to target body and h 1-5 If you chose you may target different fonts and weights as the defaults here.
body, h1,h2,h3,h4,h5 { < Insert Google Font-family statement >}
-
Now replace < Google Font-family statement > with the font-family snippet provided by Google
font-family: "Roboto", sans-serif;
-
Now you should have a text file that looks like this (ex Roboto Sans font):
/ Customer Font Override /
@import url('https://fonts.googleapis.com/css2?family=Roboto:ital,wdth,wght@0,98.9,100..900;1,98.9,100..900&display=swap'); body, h1, h2, h3, h4, h5 {
font-family: "Roboto", sans-serif;
}
Step 3: Add the custom CSS to CrowdFiber
You will need to be a Site Admin user in order to update the stylesheet.
-
Go to your CrowdFiber admin dashboard.
-
Click Settings and then Themes on the menu on the left.
.png)
-
Find CrowdFiber Current Frontend Stylesheet and select Edit Theme
.png)
-
Click custom.css from the menu on the left in the theme editor.
.png)
-
On the right, an editor will show up. Look at the very top of the file for the line -
/ CrowdFiber Provider Style Overrides /
-
Insert the text from the above steps directly below this top line
-
Your final file should look like the following:
.png)
-
Click Save. The font will be applied immediately to the CrowdFiber site.