Signature Document Automation
What is Signature Document Automation?
You must send an email to support@crowdfiber.com to activate this feature fully.
Without contacting support, your signature documents will not be sent to your customers.
- Signatures Document Automation is a feature that allows you to upload PDFs of your contract documents to CrowdFiber, and turn those PDFs into documents that can be completed and signed by your registrants in a secure environment online. The process of document delivery is 100% automated.
- Targeted signature documents are created for and delivered to the registrant in real-time after clicking the Submit buttons clicked at the end of your registration process (signature documents can also be linked to a Quote).
- Exclusive document(s) can be delivered based on a combination of details associated with the registrant:
- Market
- Zone
- Product(s) purchased
- If an order meets the requirements for more than one signature document, the documents will be merged into one contiguous document for the registrant to complete.
- Exclusive document(s) can be delivered based on a combination of details associated with the registrant:
- An email containing a link to your interactive online documents is sent to the email address entered into the Contact Info Panel in your registration process.
- Once signature documents are signed and submitted by your registrants, the registrant will immediately receive an email providing them with a downloadable copy of their signed document.
- All Signed documents are accessible in applicable order records and on the Signatures Page in your Admin Dashboard.
Signature Document Targeting
Unique documents can be targeted to a combination of:
- Markets
- Exclusive documents for Residential vs. Commercial registrants
- Zones
- Exclusive documents for individual service areas
- Product(s) purchased
- Unique documents based on products selected in a CrowdFiber eCommerce experience.
A document will only be automated when a registrant’s registration meets all of a term’s targeting requirements.
If a registration qualifies for more than one document, multiple documents will be merged into one contiguous feed of documents and delivered in a single signature experience.
How to Create an Automated Signature Document
- Click on the Documents link in the left-hand rail of your Admin Dashboard.
- On the following Signable Documents page, click the blue New document button on the right-hand side of the page.

Part 1) Upload Your PDF
-
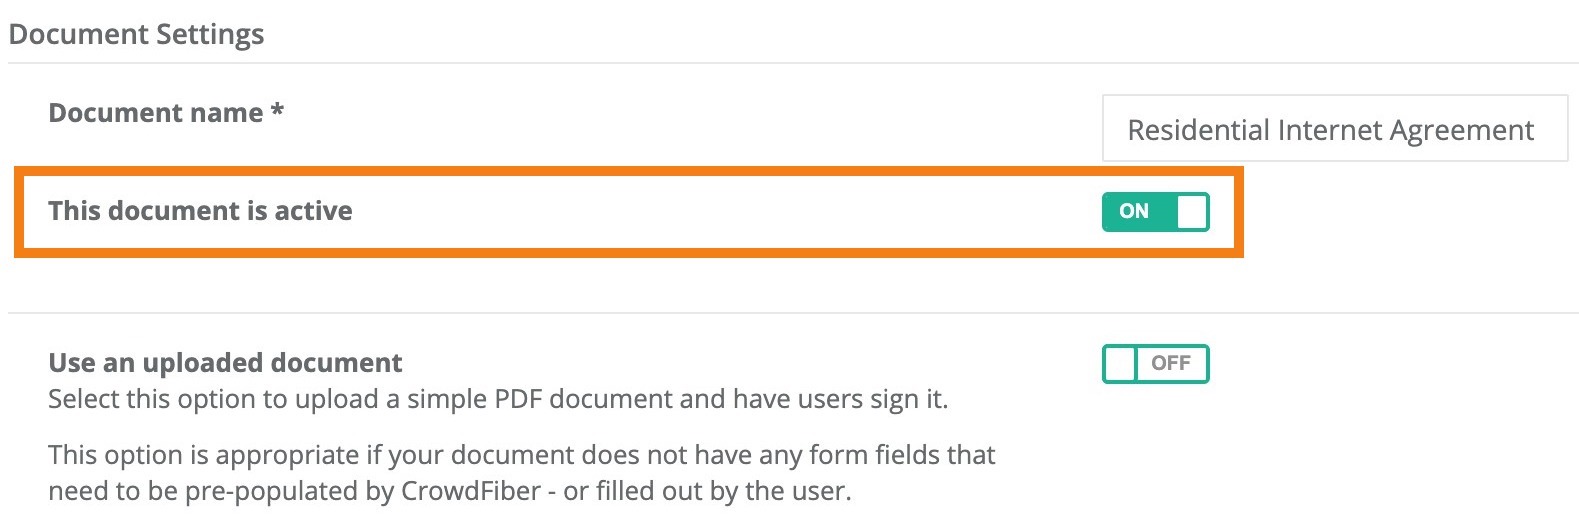
Document name textbox
- Create an internal name for your document. This name will be the unique identifier for this document throughout your Admin Dashboard.
-
This document is active slider
-
On
The document will be automated when applicable
-
Off
The document will not be automated nor applied to any part of your user experience.
- Create an internal name for your document. This name will be the unique identifier for this document throughout your Admin Dashboard. 2. This document is active slider
-
On
The document will be automated when applicable.
-
Off
The document will not be automated nor applied to any part of your user experience.
-
-
Use an uploaded document slider
To create an interactive electronic document, leave this slider in the Off position
-
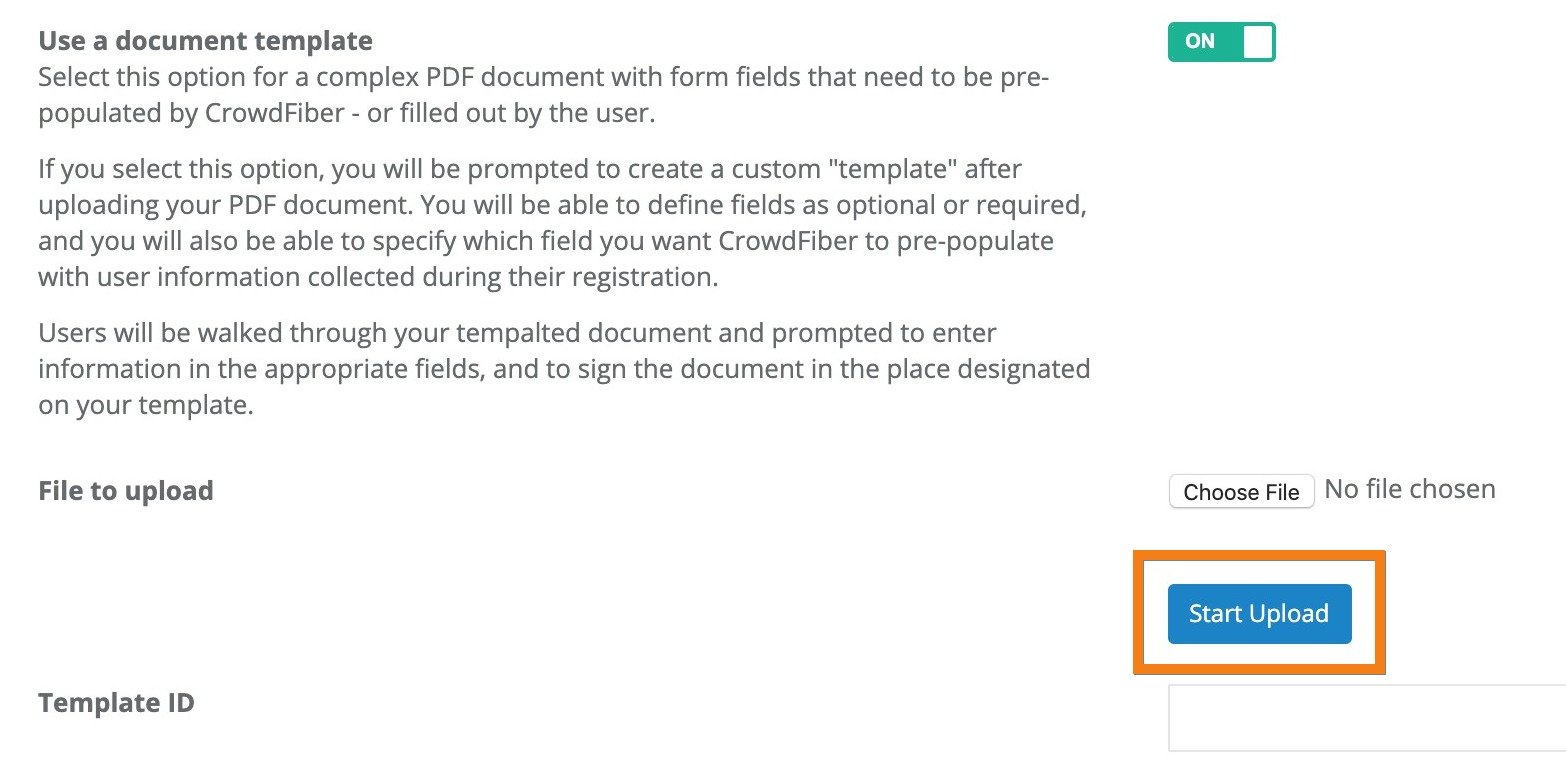
Use a document template slider
-
On
Expose the document uploader
-
Off
No PDF is able to be uploaded
-
-
Choose File button
-
Click the Choose File button to select a PDF document from your computer to upload.
-
-
Start the Upload
- After you have selected your file from your hard drive, a blue Start Upload button will appear below the Choose File button that you clicked in the previous step.
-
Click the Start Upload button to upload your PDF.
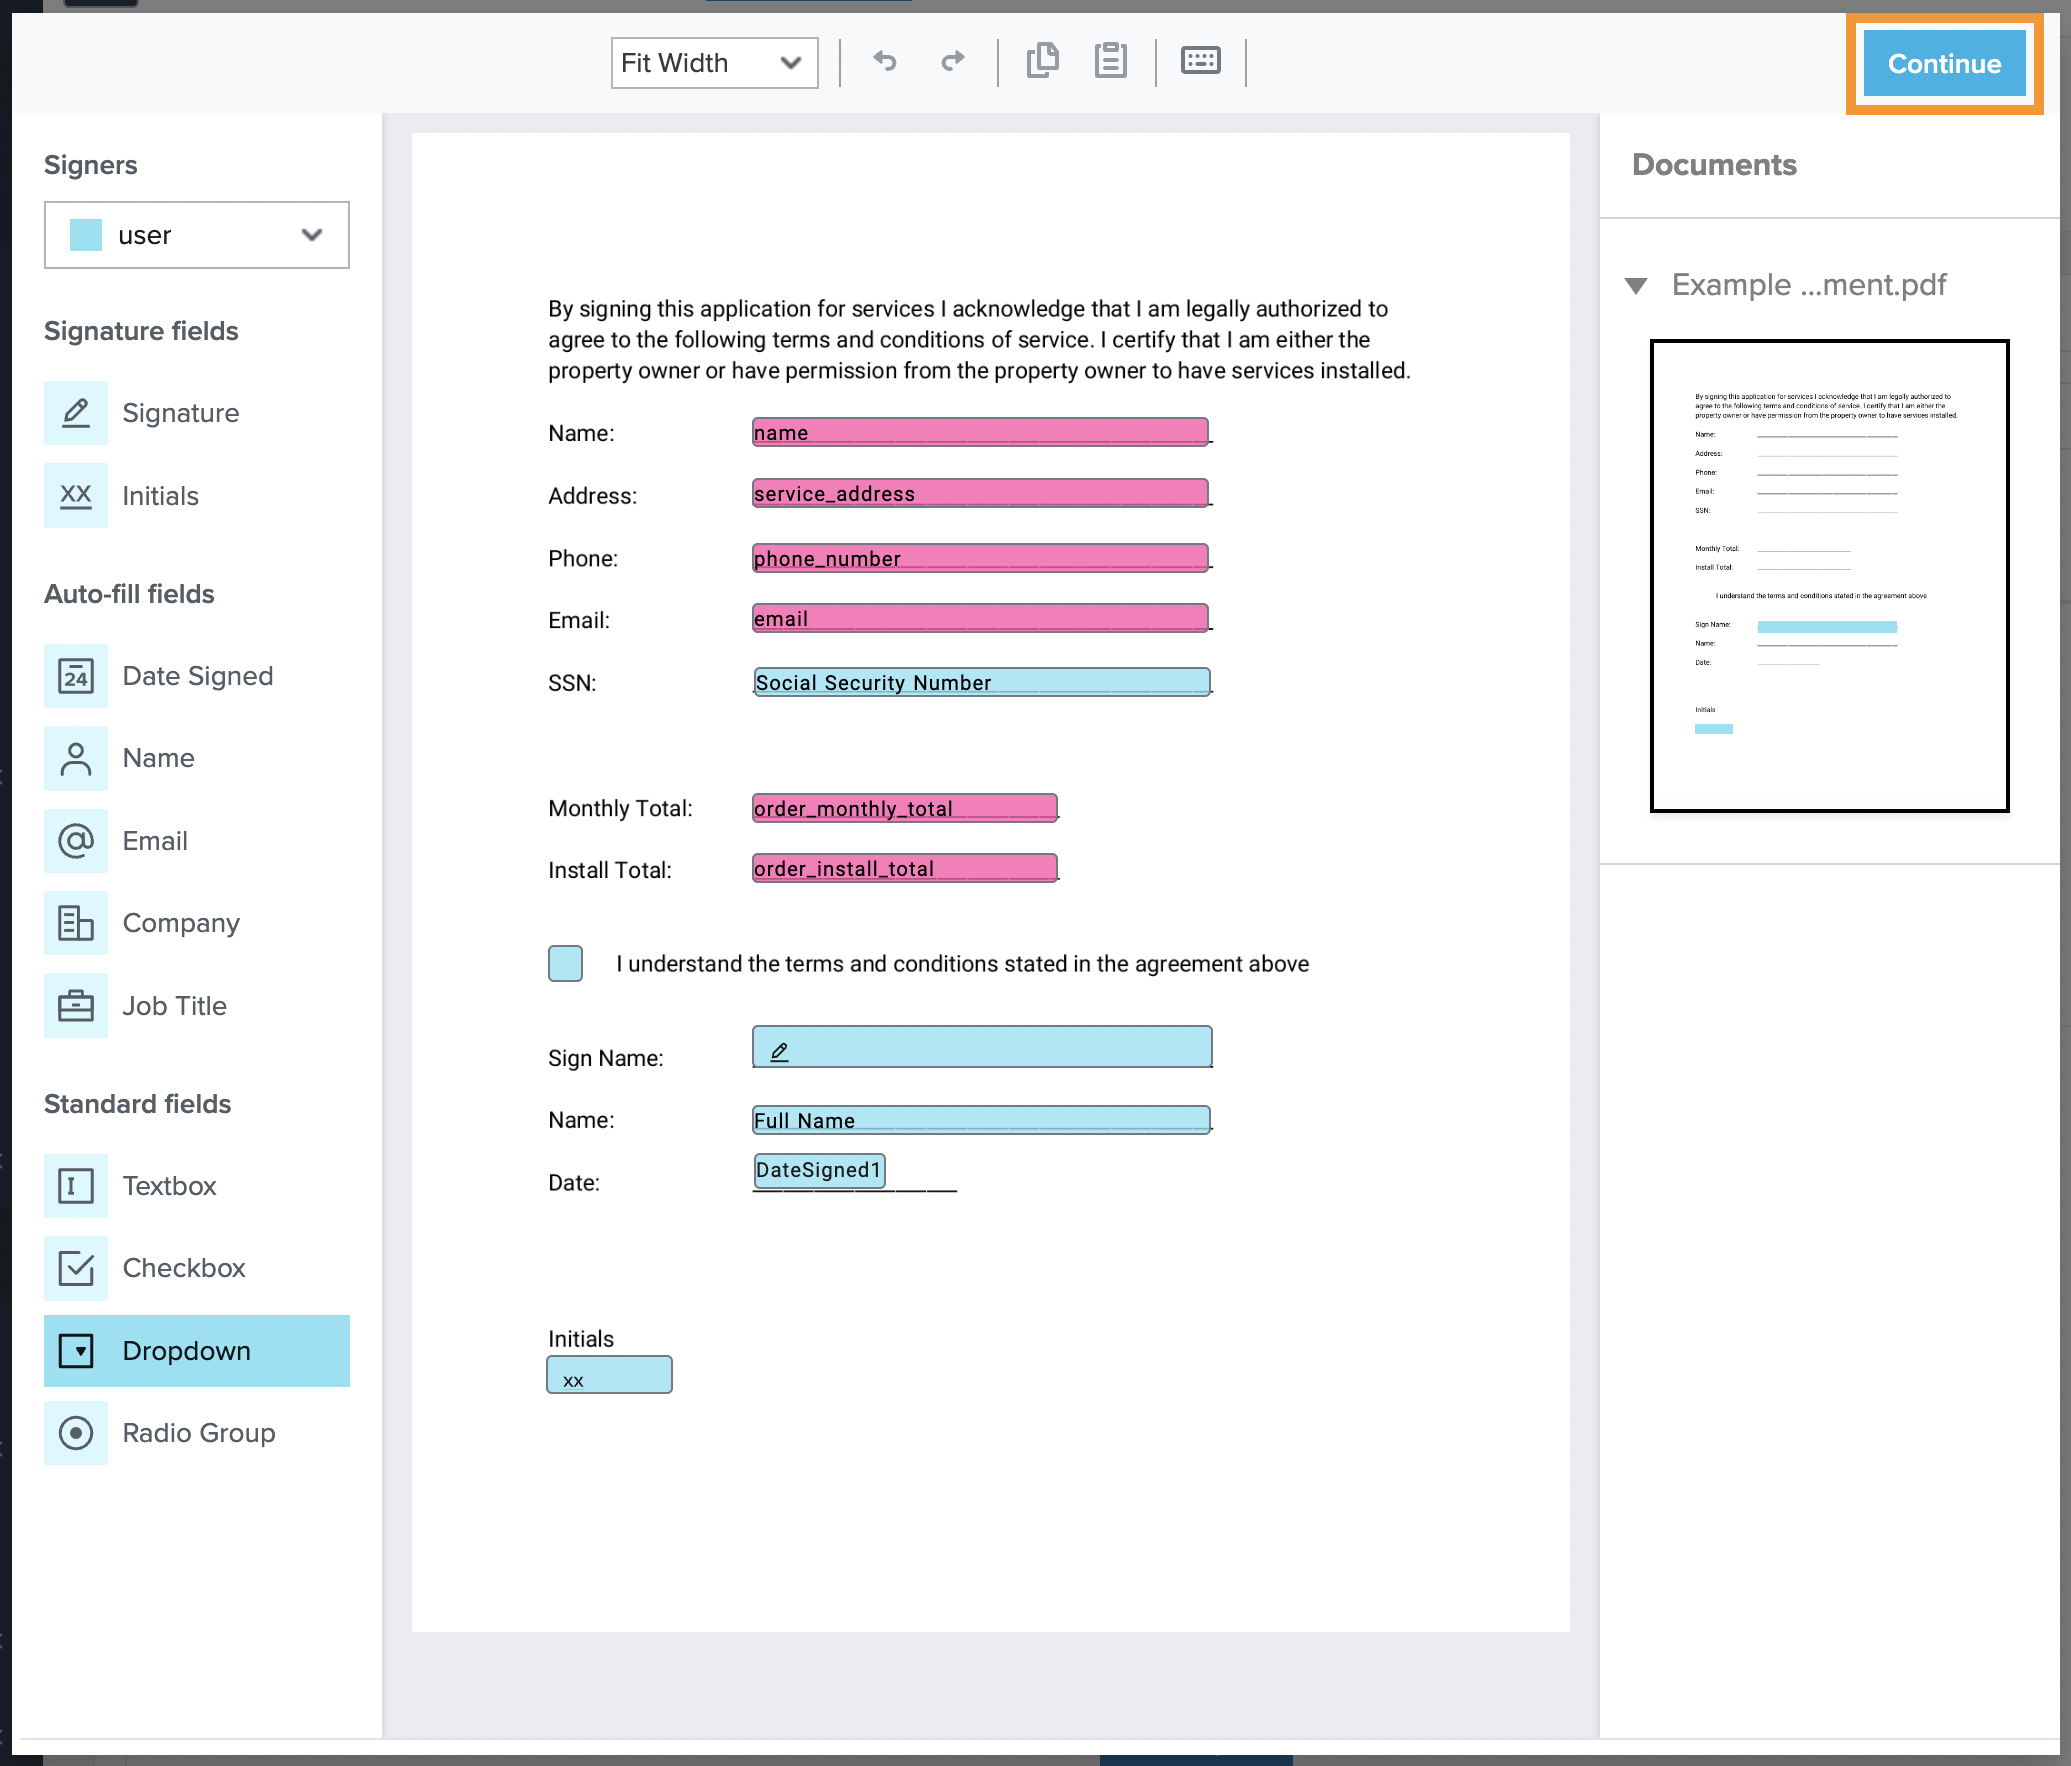
Part 2) Create Your Template
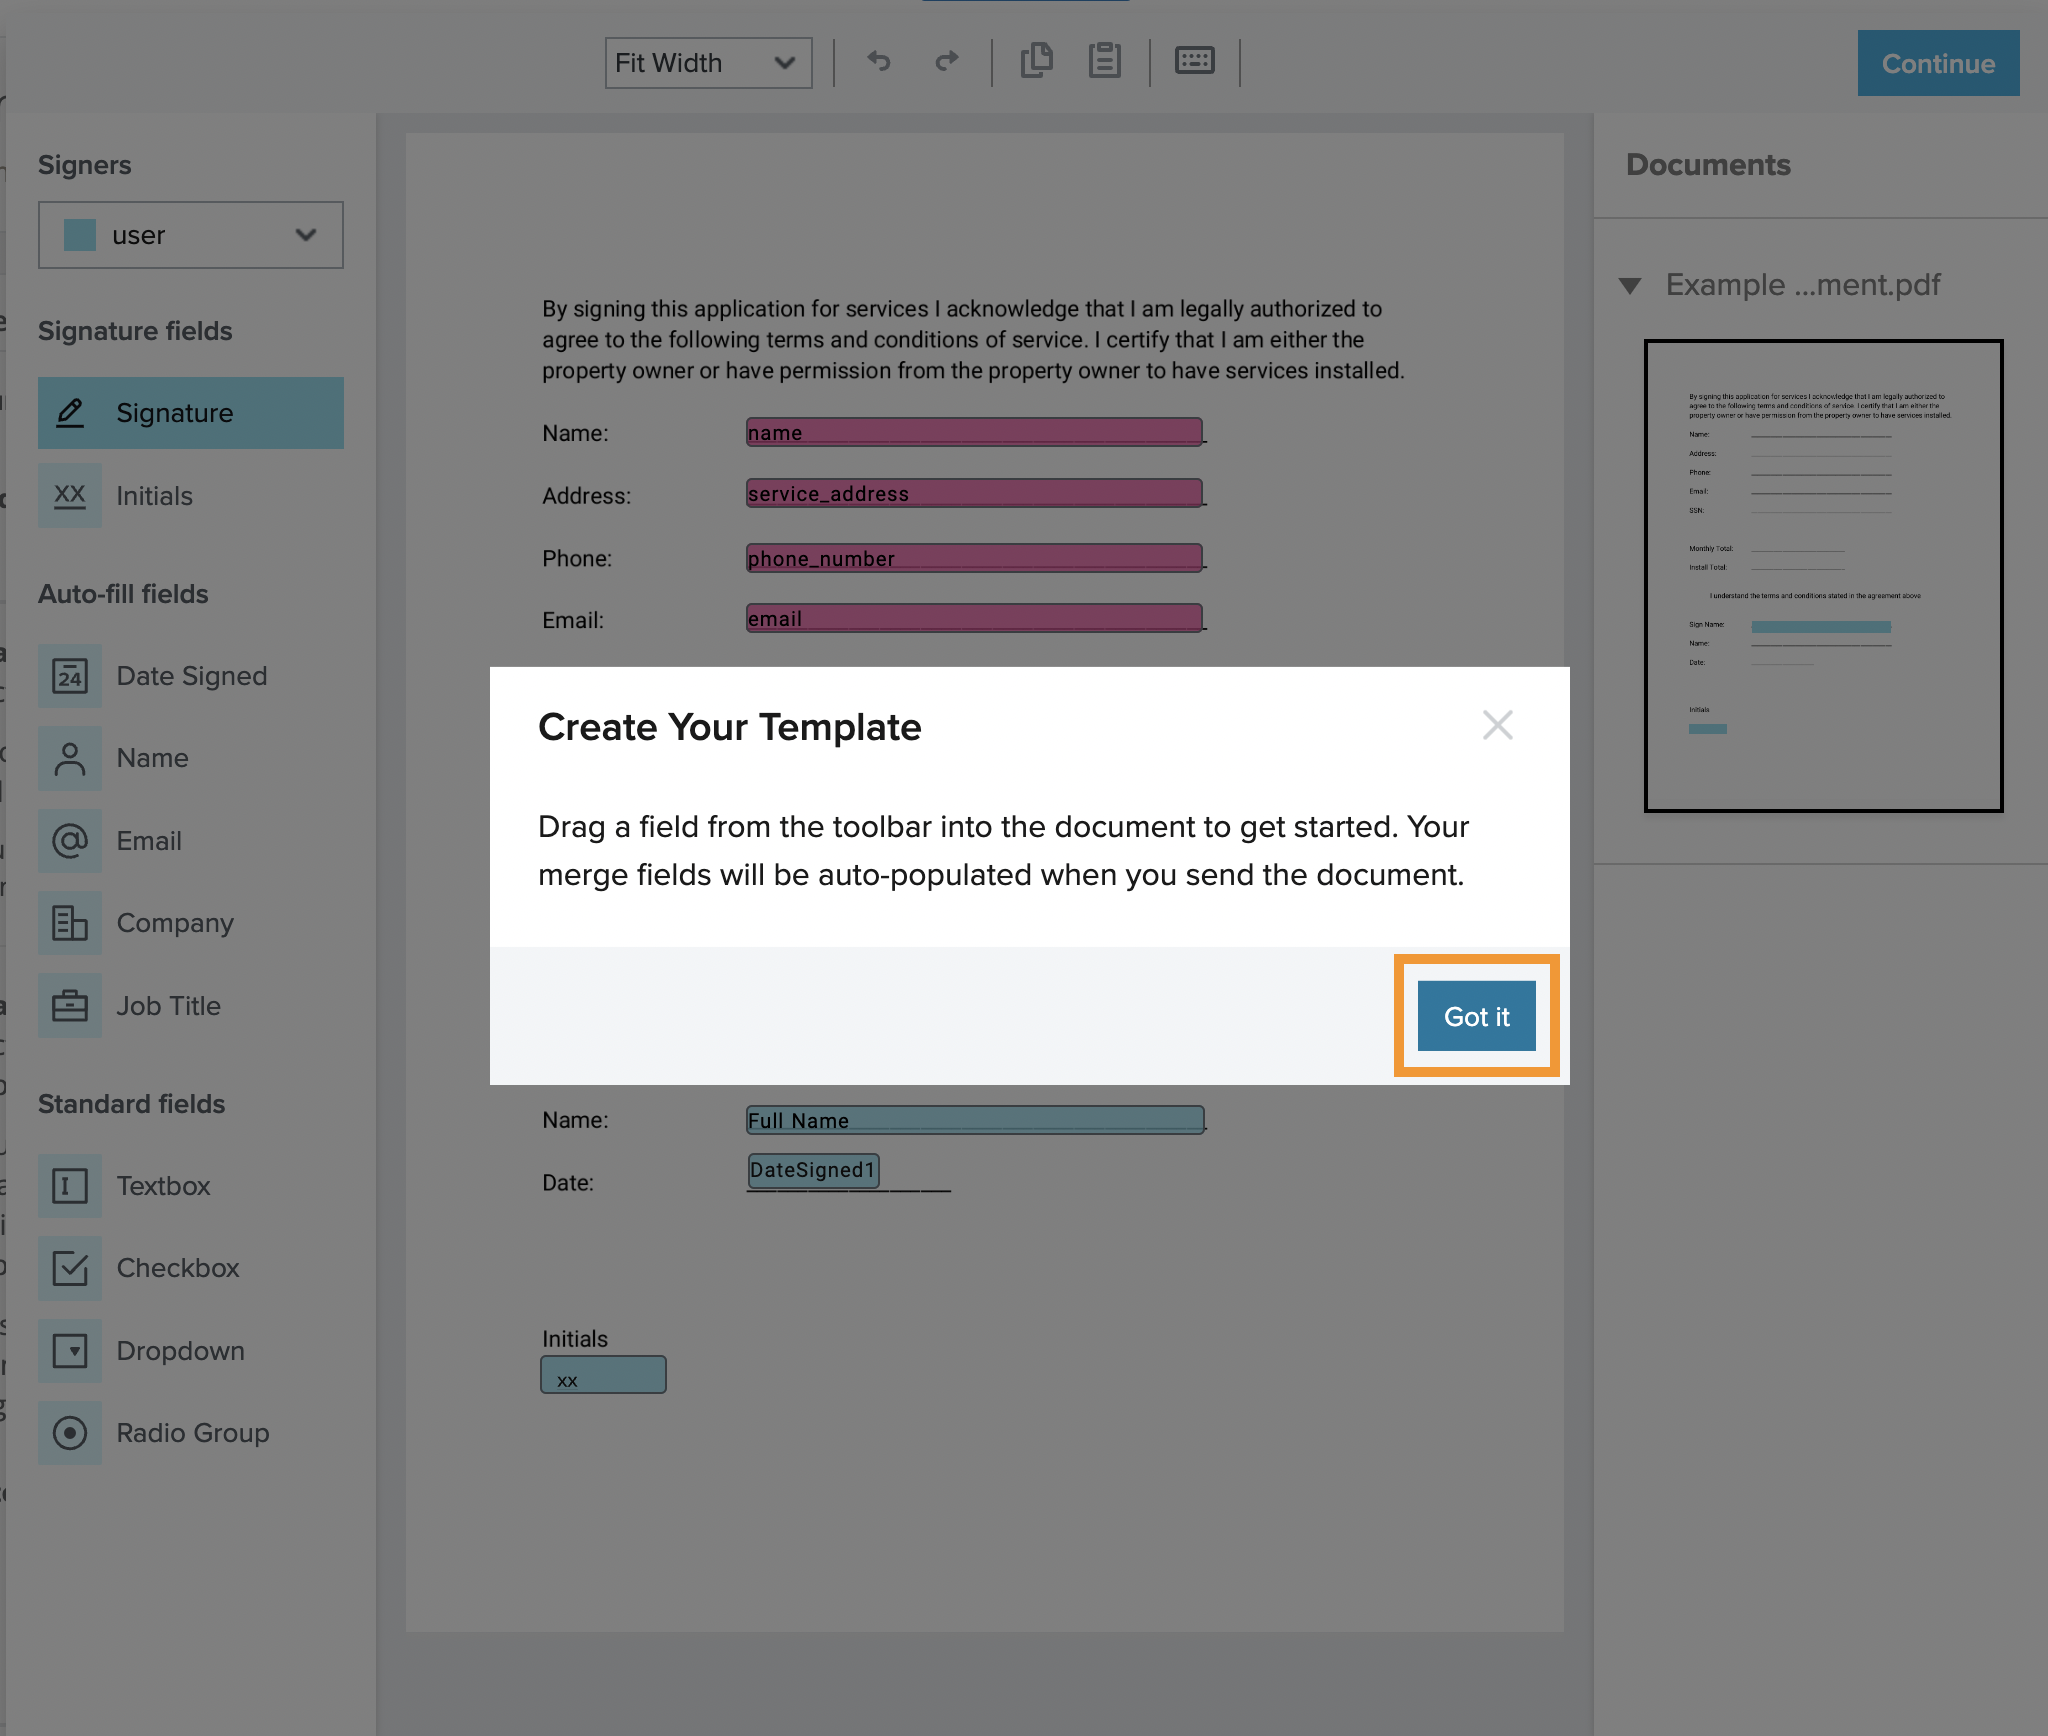
- After clicking the Start Upload button, an electronic document editor will automatically open; this document editor will display a Create Your Template popup that overlaps the PDF doc that you chose for upload.
1. To reveal your document for editing, click the blue Got it button located in the bottom right-hand corner of the Create Your Template popup.
2. Add an Electronic Field
-
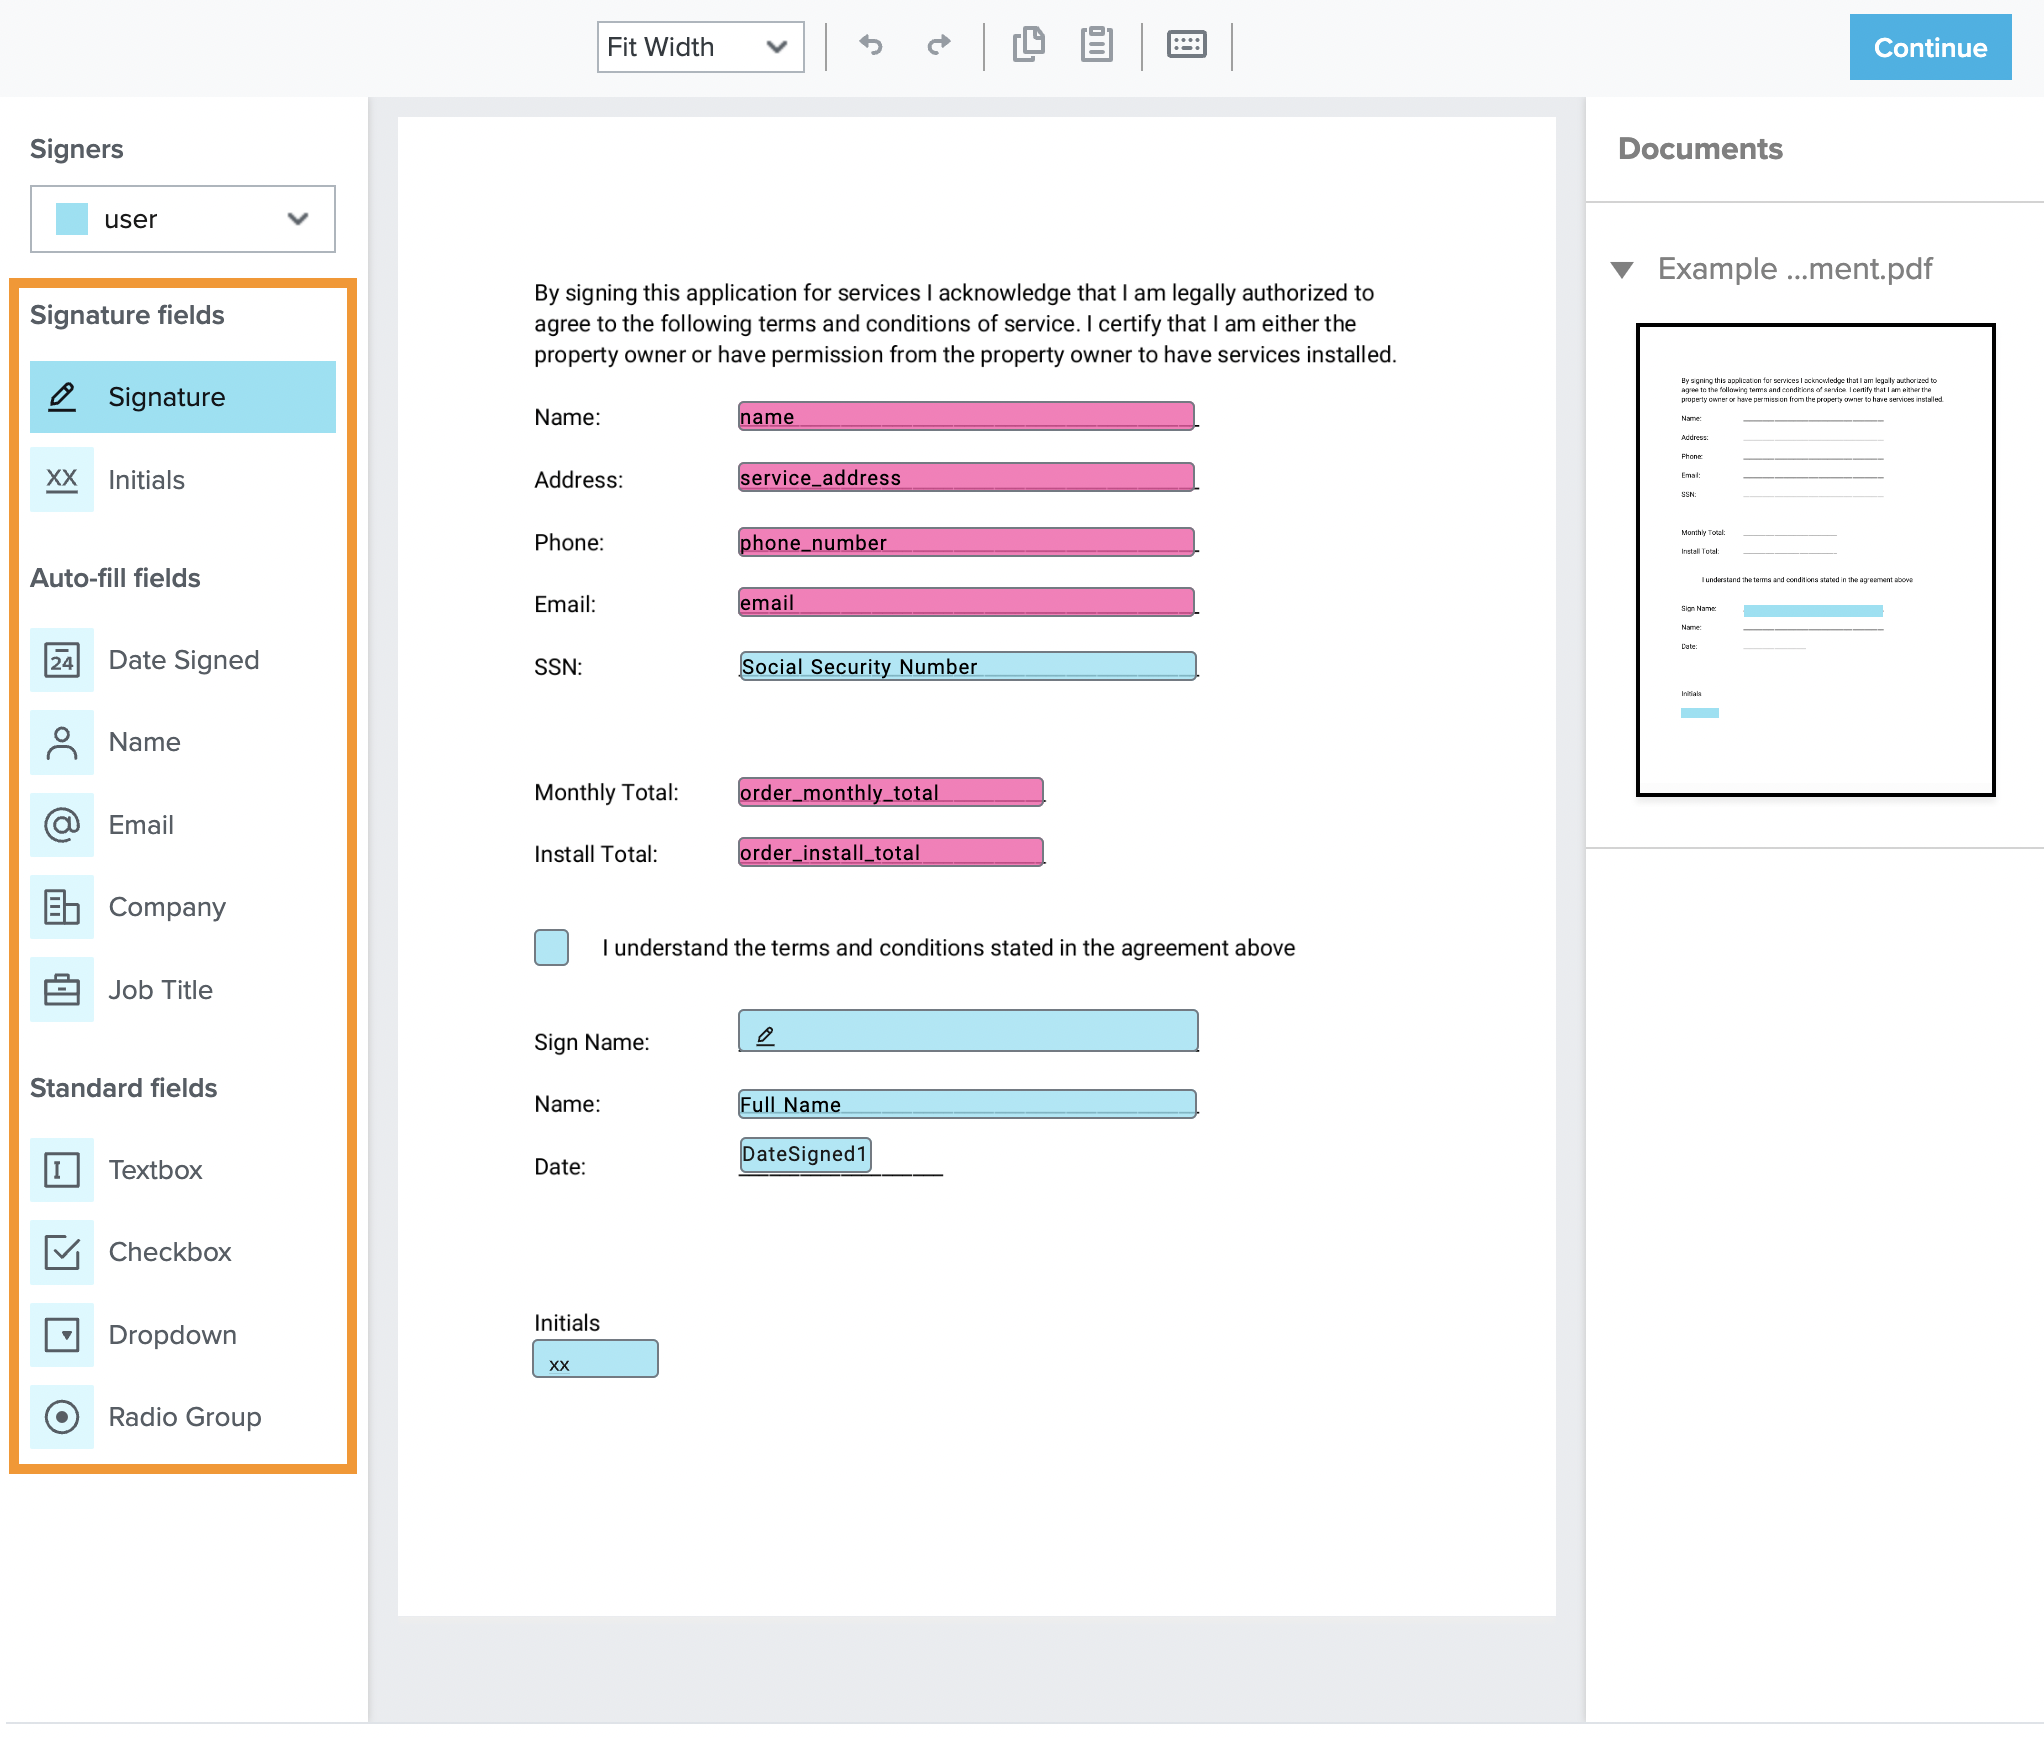
Next up, you'll use the document editor to transform your PDF into an interactive, digital document by adding your electronic fields.
- Simply drag and drop the appropriate form field located in the left-hand rail of your document editor on the page into the corresponding form fields within your document (see the design tips and field descriptions below).
-
Design Tips:
-
Adjust the size of the field.
Drag-and-drop the corner of any electronic field to alter the dimensions of the field to fit your document.
-
Create duplicate fields
Double-click the PDF (outside of a form field) to duplicate the size and function of the previously created field.
-
Fine-tune a field placement
Single click on any form field, and you can use the directional keys on your keyboard to make small adjustments to the placement of the selected field.
-
-
- Simply drag and drop the appropriate form field located in the left-hand rail of your document editor on the page into the corresponding form fields within your document (see the design tips and field descriptions below).
-
Field Descriptions
-
Signature Fields
-
Signature
A textbox allowing a registrant to write, type, or upload their signature to the document.
-
Intials
A textbox allowing a registrant to initial fields and pages within a document.
-
- Auto-fill fields
-
Date Signed
Autofills with the date the document is submitted.
-
-
The following fields do not Autofill.
Use a Textbox field (described below) to autofill information submitted in a registration process into a document.
-
Name
A field filled in by the registrant, used for asking the registrant to enter their full name.
-
Email
A field filled in by the registrant, used for asking the registrant to enter their email address.
-
Company
A field filled in by the registrant, used for asking the registrant to enter their employer's name.
-
Job Title
A field filled in by the registrant is used for asking the registrant to enter their job title at the company they've registered.
-
-
-
Standard Fields
-
Textbox
A diverse field with multiple settings
- Filled out by the registrant to collect information not submitted during a registrant process
- Autofilled with details captured in a registration process to make completing the document easier for the registrant.
-
Checkbox
A classic checkbox
-
Dropdown
A classic dropdown menu with customizable lists.
-
Radio Group
A classic radio button experience allows a list of custom options and only one option button allows it to be selected and submitted with the document.
-
Part 3) Create Settings for Your Form Fields
- Customize the interactions with each field in your document with the options located right-hand rail of the document editor. customization Options Include:
-
Assigned To Drop-Down Menu This drop-down menu allows you to choose who is responsible for adding information to this form field.
-
User:
The field is interactive and will be empty when the document opens and is ready for your registrant to complete.
-
Me:
You fill out the field with the static information you'd like to have displayed in this document every time it is delivered to your customers.
-
Sender:
This option will autofill form data for your customers; it dynamically fills form fields throughout your document with contact and order information your customers have previously submitted.
-
-
Required Field slider
-
On/set to the blue check mark position
The field must be completed before the document is eligible to be submitted.
-
Off/set to the gray x mark position
The field will be optional in the submission of a document.
-
-
Checked by Default (checkbox fields only)
-
On/set to the blue check mark position
The checkbox will be pre-checked when the user opens the document.
-
Off/set to the gray x mark position
The checkbox will be unchecked when the user opens the document.
-
-
Mask Typed Text
-
On/set to the blue check mark position
Text appears as asterisks to other signers and on the completed/submitted PDF.
-
Off/set to the gray x mark position
Text in the field will be legible to other signers and on the completed/submitted PDF.
-
-
Placeholder Text
The initial text seen in the textbox in all fields that do not contain any auto-filled data. Your placeholder text should be a succinct description of what data belongs in the textbox. Examples include: Full Name or Billing Address.
-
Formatting
The option selected from these drop-down menus will define the font type and font size that will appear in your textboxes. Use this style option to make sure the form filed data matches the pre-existing font style in your PDF document.
-
What Text Goes Here (only available in the Assigned to Sender fields)
The attribute selected from this drop-down menu will be the contact or order attribute that is auto-filled into the text box.
-
Validation (only available in User fields)
This option helps you keep your form data clean and in the correct format. The option selected from this drop-down menu restricts the type and quantity of characters that can be entered into a text box.
-
If the customer does not follow your Validation Type and tries to submit your form, they will receive a notification that they've incorrectly filled out a field. They will need to correct their error before the form can be submitted.
For example:
If you're collecting a name and have set the Validation Type to Letters Only, but the customer enters numbers or special characters other than letters when the customer clicks the Submit button to submit the form, they will receive the notification to correct their error.
-
-
Field Name
This defines how the name of the textbox will appear in your internal reporting documents
-
Radio Name (radio button fields only)
This defines how the name of the textbox will appear in your internal reporting documents
-
API ID
This field is for CrowdFiber Employee use only. Do not adjust the data in this field.
Part 4) Save Your Form Fields
- Click the blue Continue button in the upper right-hand corner of the document window.
Part 5) Automate The Delivery of Your Document
Every automated signature document is made accessible through the automated delivery of an email containing a button that links the registrant directly to an environment where they can review and complete their required document(s).
Follow the slider settings in green to automate the delivery of your document.
-
I want this document to be attached to signature requests emails for another document slider
-
On
Attach the document you're editing as a static, non-interactive PDF email attachment to the email containing a link to the document you select in the Select Document drop-down menu.
-
Off
The document you are editing will be created as an interactive, electronically signable PDF.
-
Attach a traditional (non-interactive) PDF to your signature request emails:
- Click the I want this document to be attached to signature request emails for another document slider.
- Click the Select Document drop-down menu.
- Choose the document you'd like to include as a classic email attachment.
Documents attached as standard PDFs do not autofill any customer or company data.
-
-
-
Click the I want to collect signatures for this document slider.

-
On
The document you are editing will be created as an interactive, electronically signable PDF.
-
Off
The document you are editing will not be created as an interactive, electronically signable PDF.
-
-
Click the Send a signature request for this document after backing slider.

-
On
The document is automatically created for the registrant after their registration is submitted. In addition, an automated email is instantly sent to the registrant after they complete their registration process. The email:
- Includes your organization's name as the sender
- Includes your custom logo in the email header
- Includes a Sing Here button that links the registrant directly to their electronically signable document
-
Off
The document is automatically created for the registrant after their registration is submitted. However, a link to this electronically signable document will have to be manually sent to your registrants.
-
-
Content to include in the body of your signature request email text box.
The text entered into this textbox will be the content included in your automated email to the registrant that contains a link to the document you're editing.
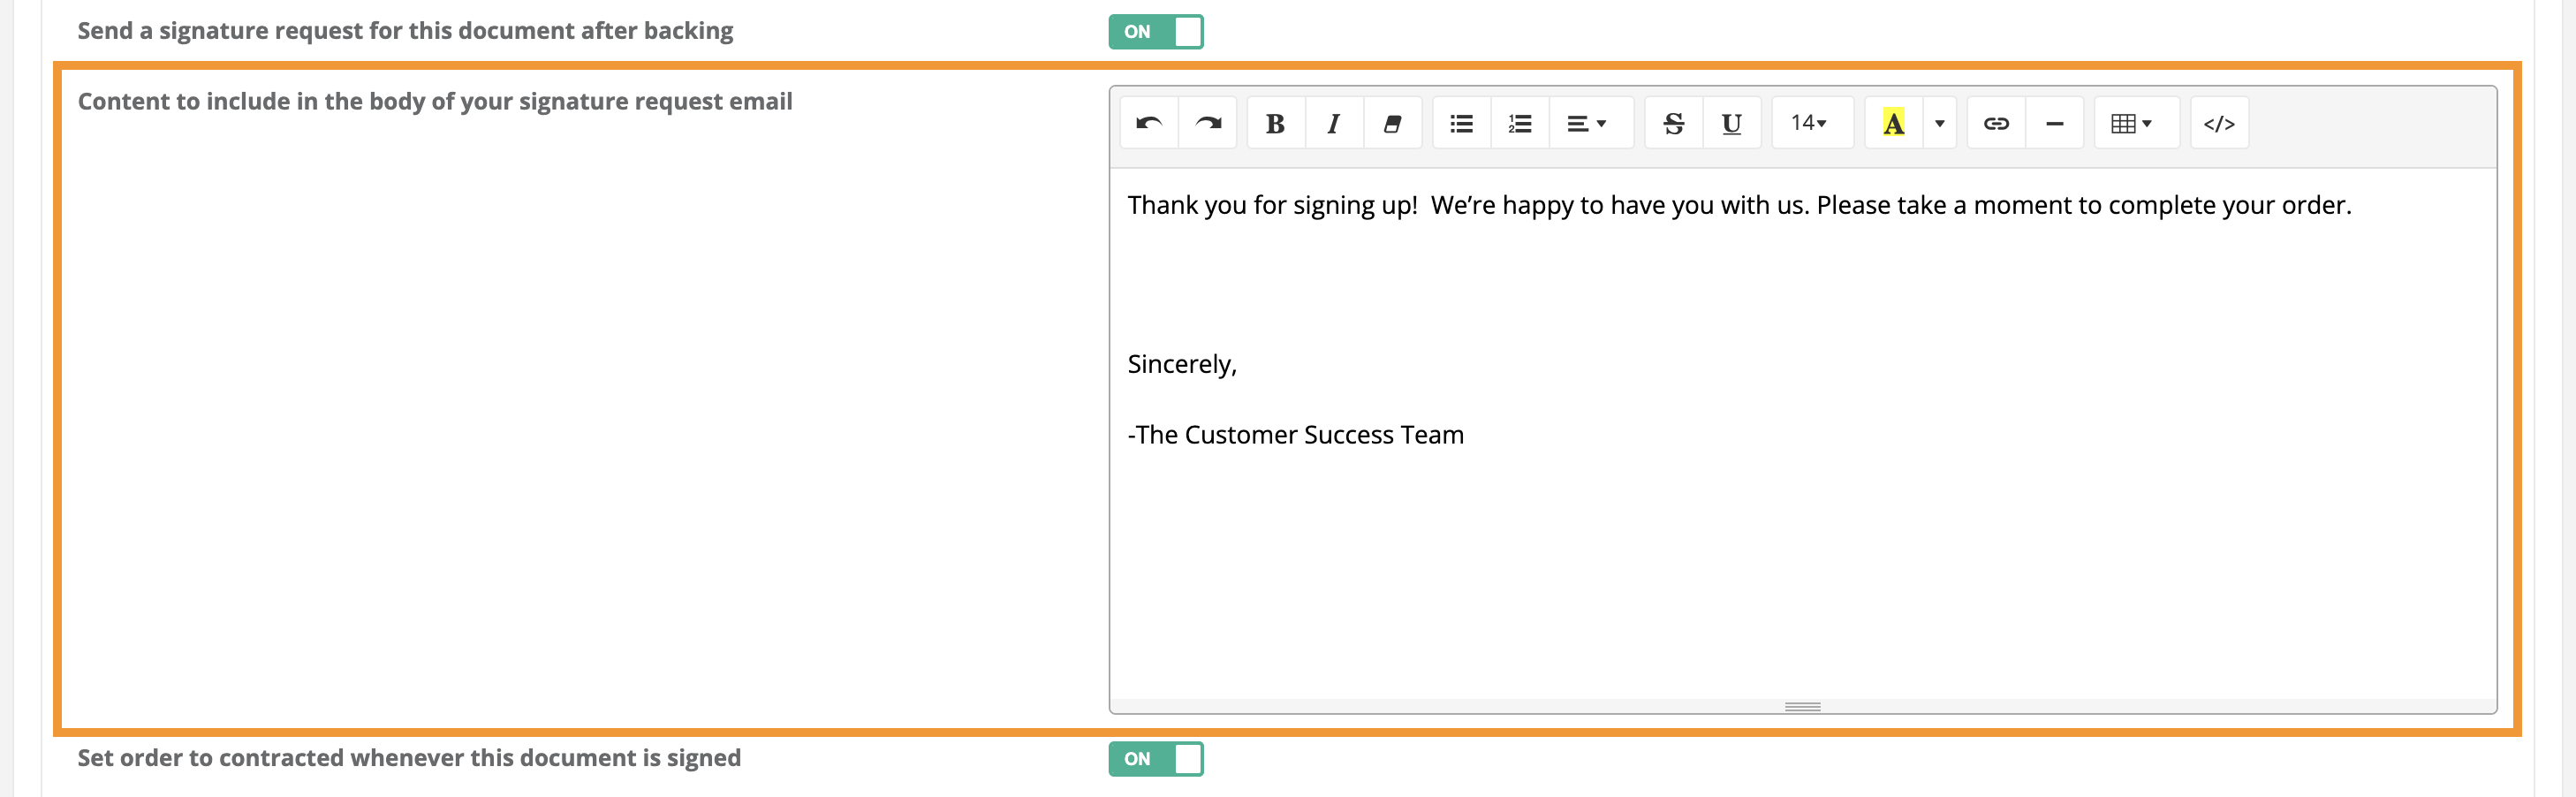
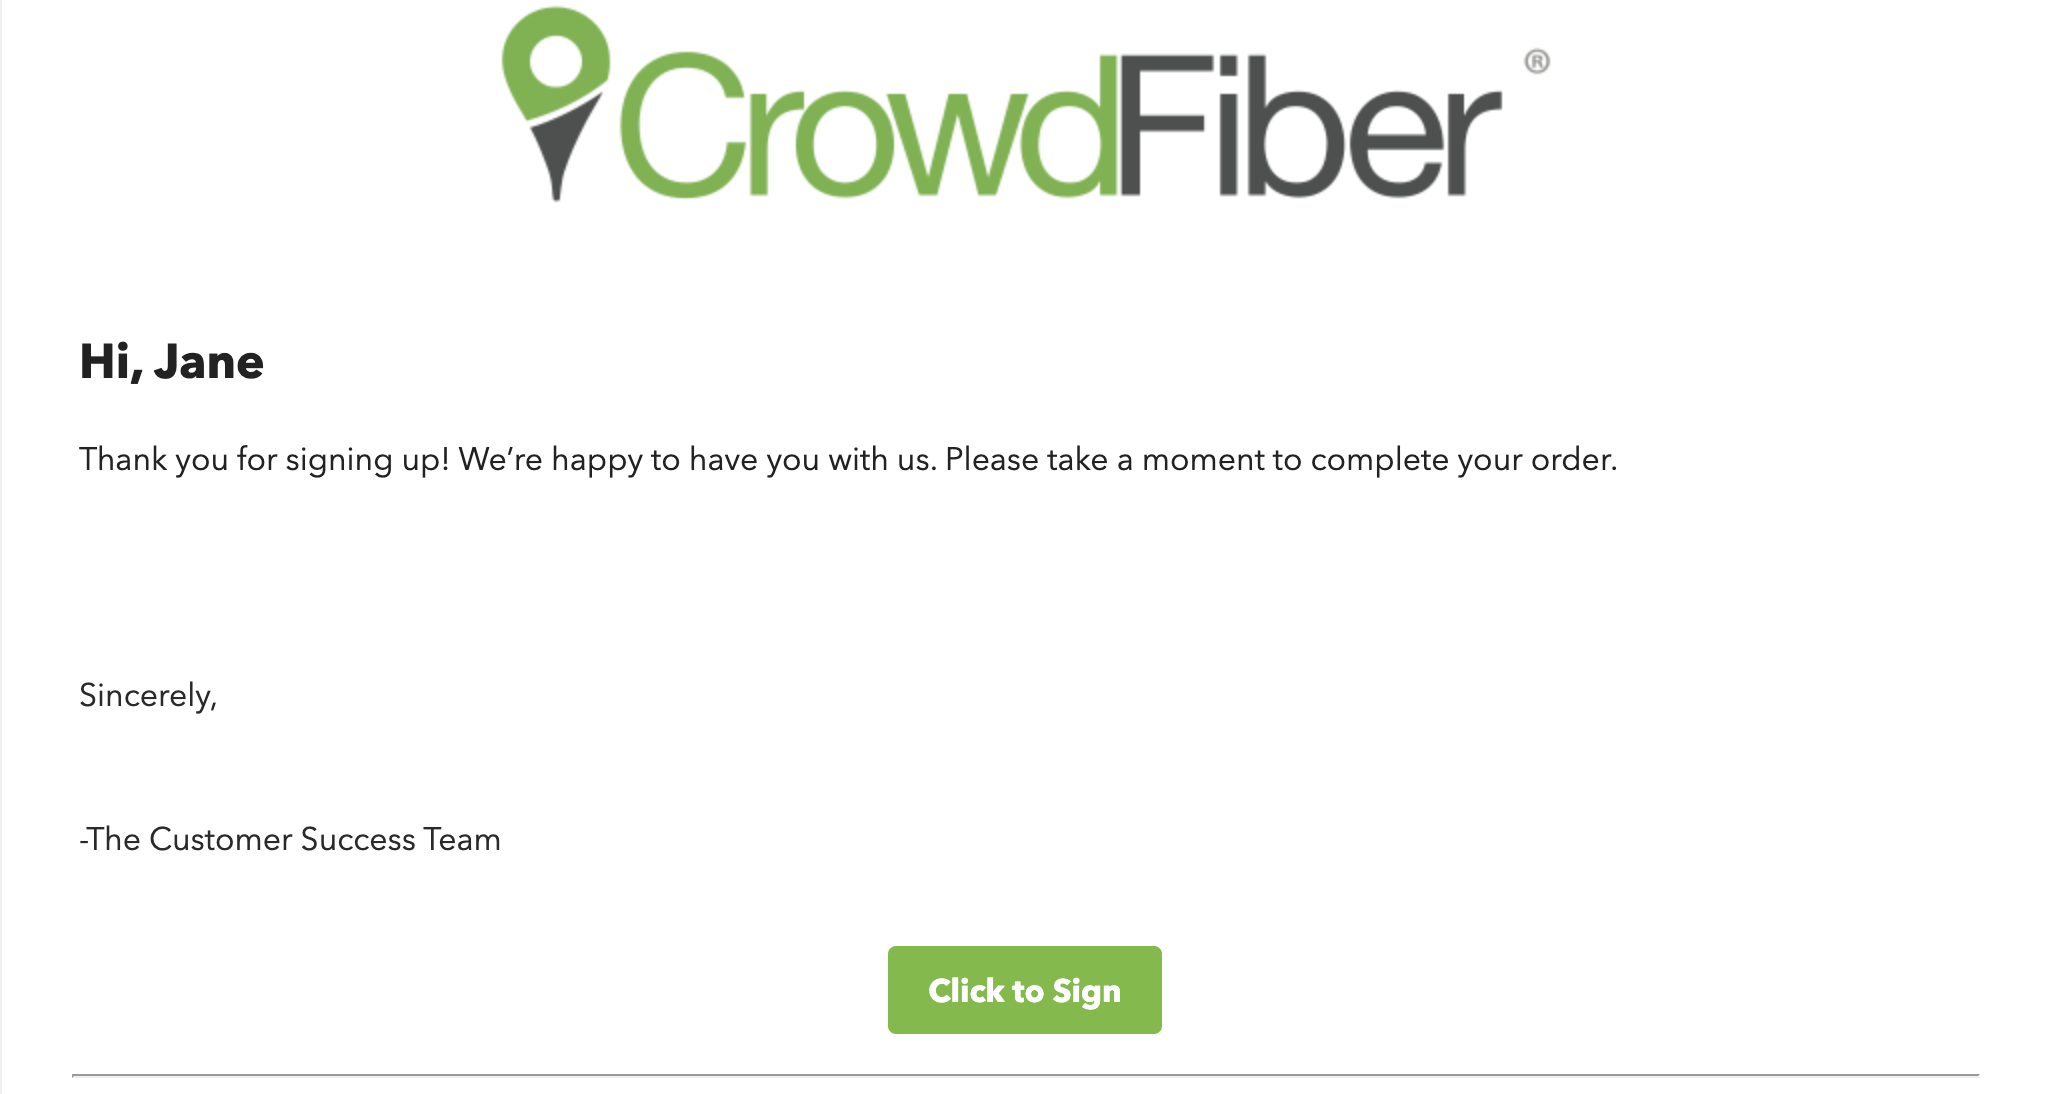
CrowdFiber technology automatically merges the first first name of the regsitrant and a button that links the registrant directly to an environment where they can review and complete their required document(s).
Email Example:
-
Set order to Contracted whenever this document is signed slider

-
On
This is the recommended setting. The Contracted checkbox in the order record associated with this document's registration process will be automatically checked when the document is completed and submitted.
-
Off
This slider has no effect on your user experience nor your order records when the document is submitted.
-
-
Append an Order Summary to this document

-
On
This is the recommended setting. Automatically populate a summary page into the last page of the delivered document for the registrant to review when completing the document. The order summary includes:
- A custom title (entered into the Title to include at the top of order summary textbox).
- A comprehensive list of products purchased.
- All associated monthly costs of services purchased.
- All associated installation costs of services purchased.
- Off
This setting has no effect on your user experience.
Order Summary Example:
-

Part 6) Target Your Document Delivery
- Documents can be made exclusive to a selection of market(s), zone(s), and products purchased. For a document to be created and delivered, the registration must meet the criteria for all market, zone, and product targeting established in the document record.
-
Target this product to these markets
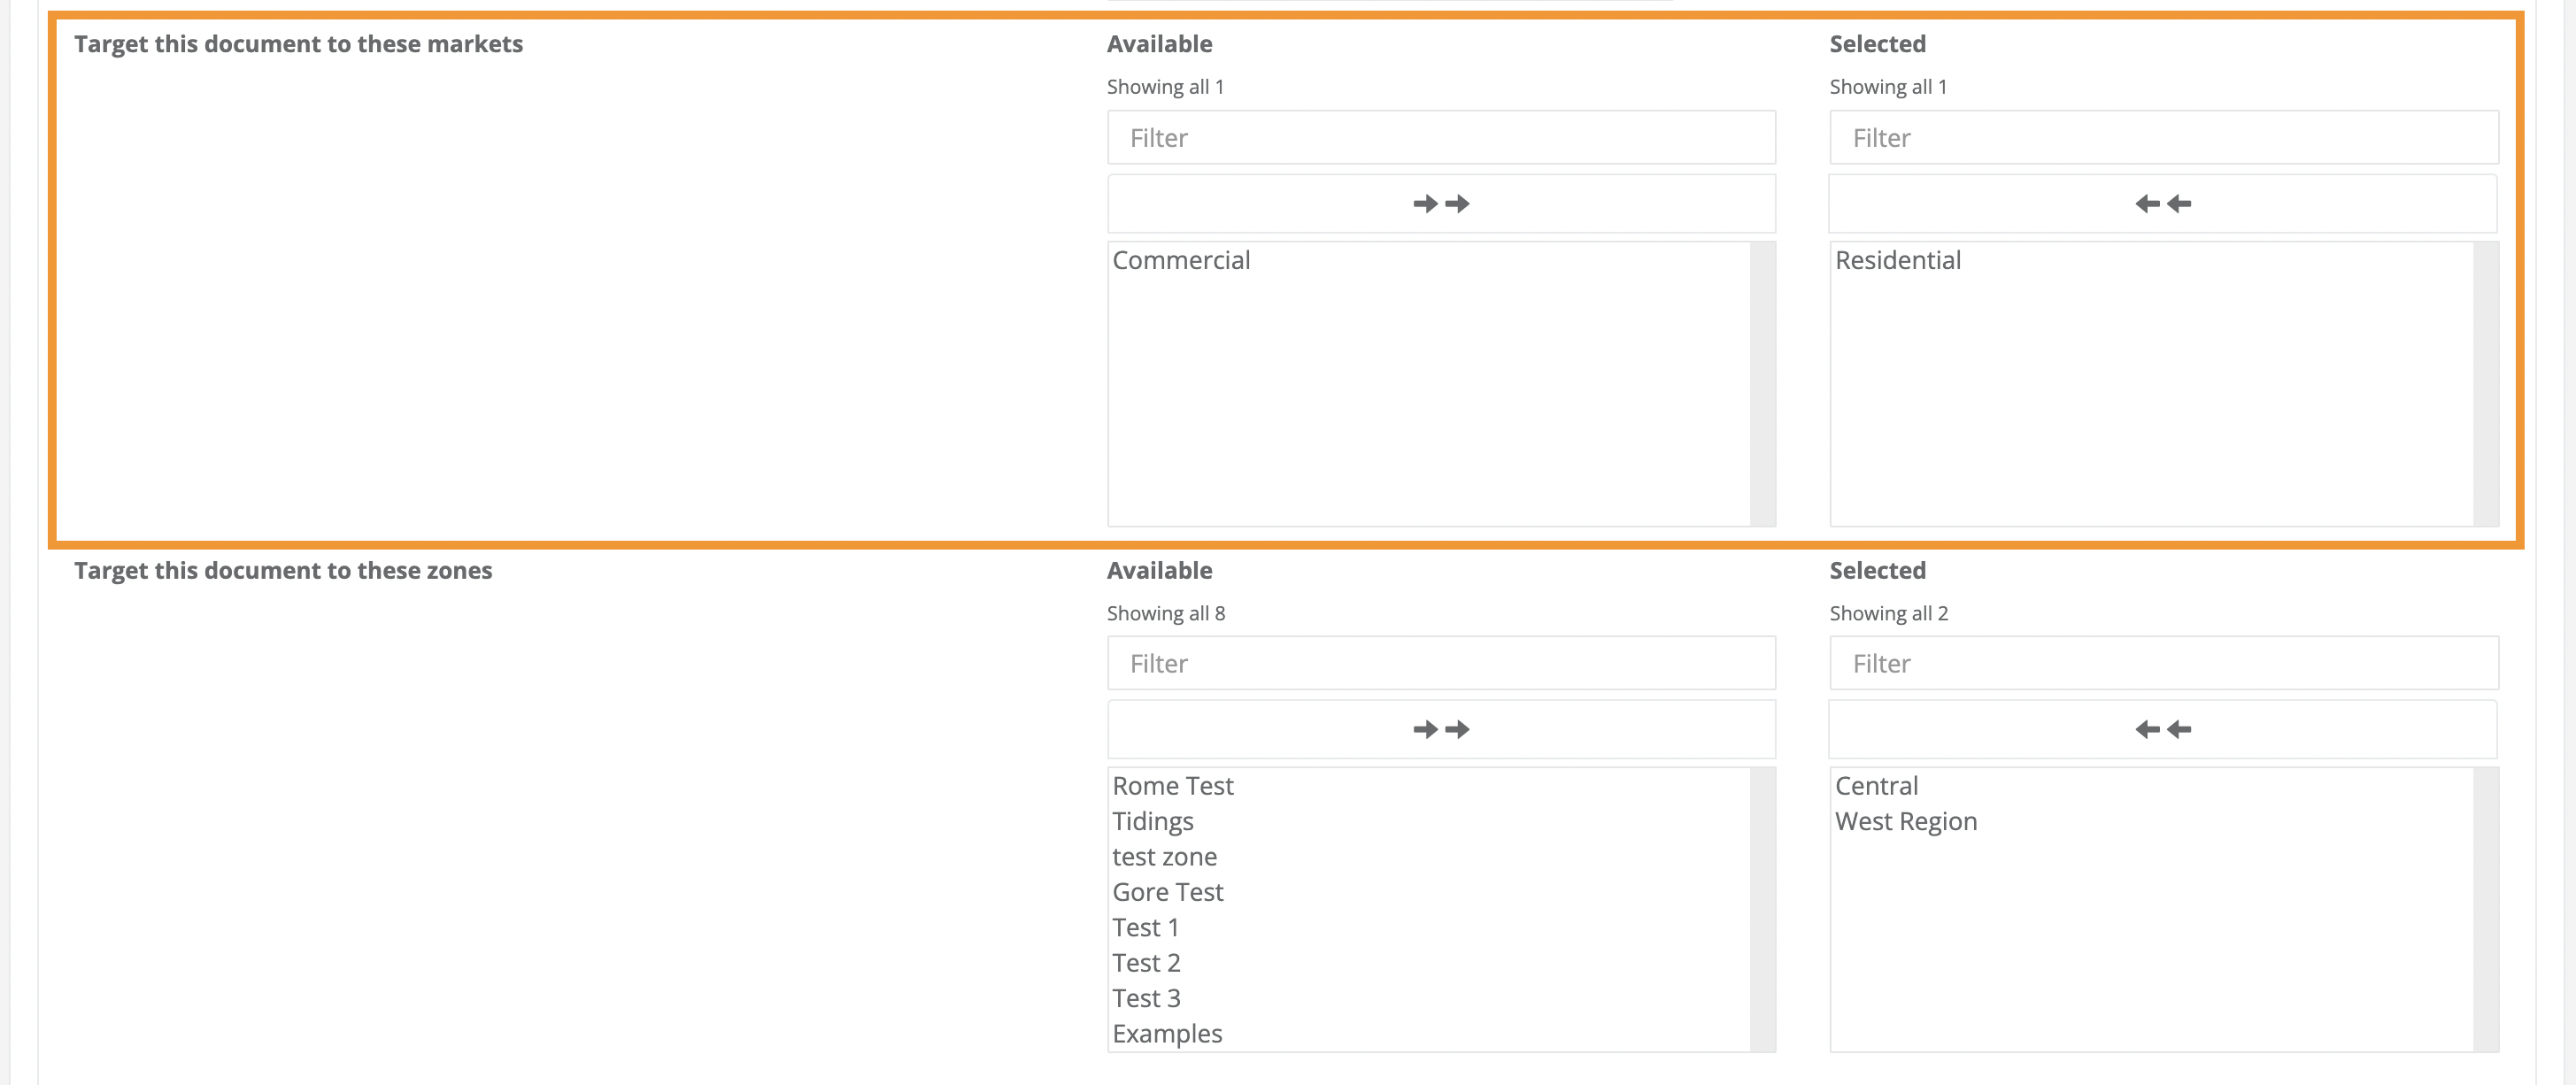
- Create exclusive documents for your residential vs. commercial markets. Autofill and deliver specific documents for registrants based on the market a registrant selects in the Service Type drop-down menu in their address search.
-
Documents can be exclusive to registrants in an individual market or available for creation and delivery in multiple markets. This setting defines the type of registrant that is applicable/eligible for this document.
- Residential
- Commercial
- Multiple markets
The markets that will be eligible for this document are seen in the Selected Column. Click a market name to add or subtract a market name from the Available or Selected column.
-
Target this Document to these Zones
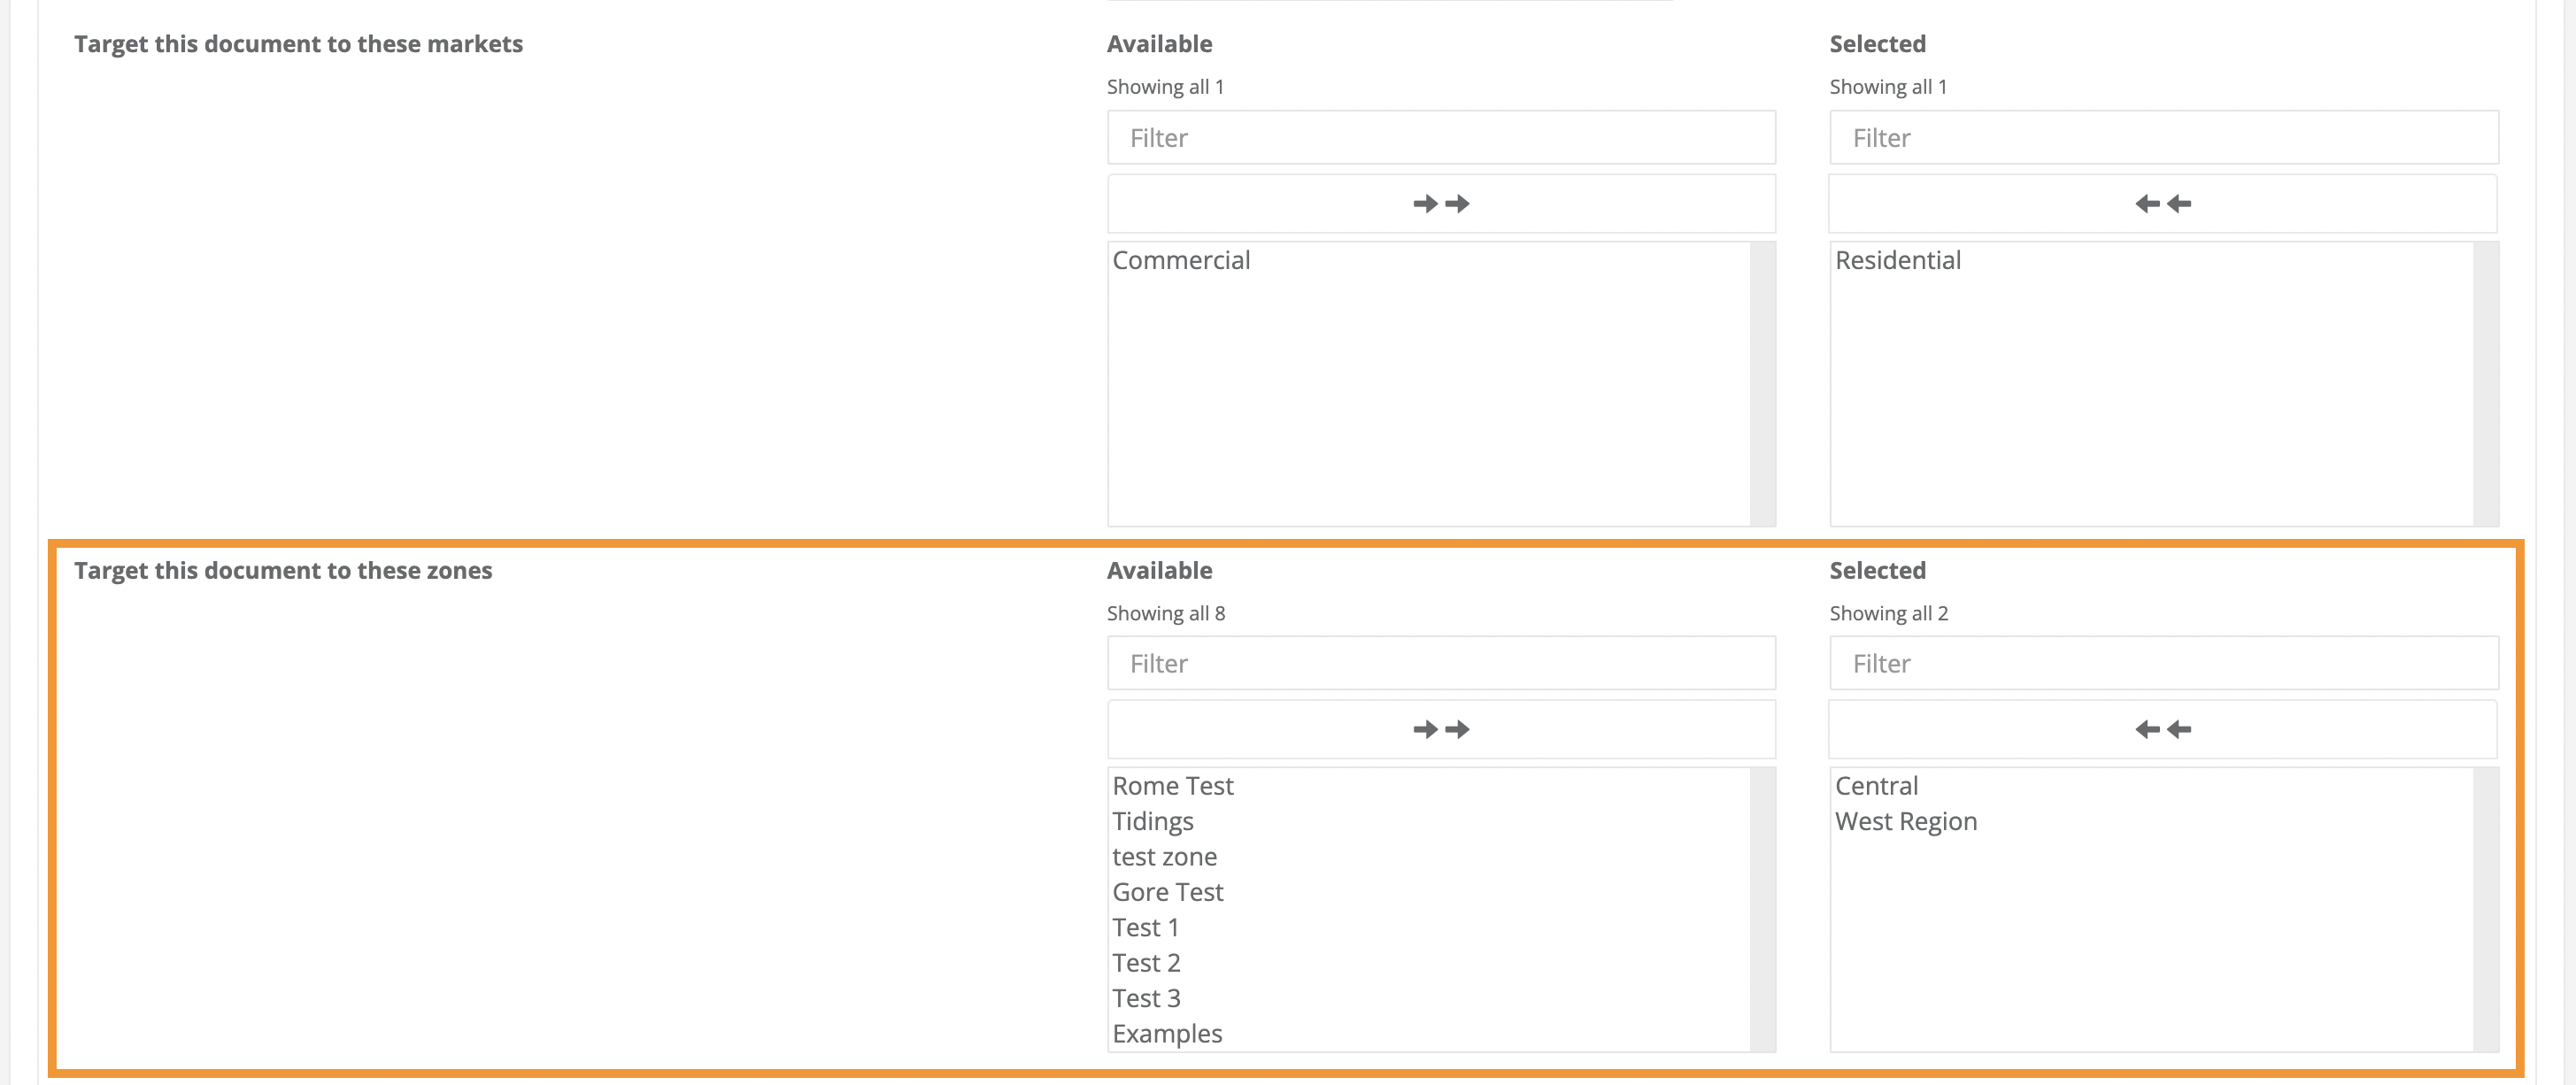
- Create exclusive documents for your registrants in specific service area(s).
-
Documents can be exclusive to registrants in an individual zone or available for creation and delivery in multiple zones. This setting defines where this addresses being registered must exist for this document to be created and delivered to a registrant.
- One zone
- Multiple zones
The zones/service areas where registrants will be eligible for this document are seen in the Selected Column. Click a zone name to add or subtract a zone from the Available or Selected column.
-
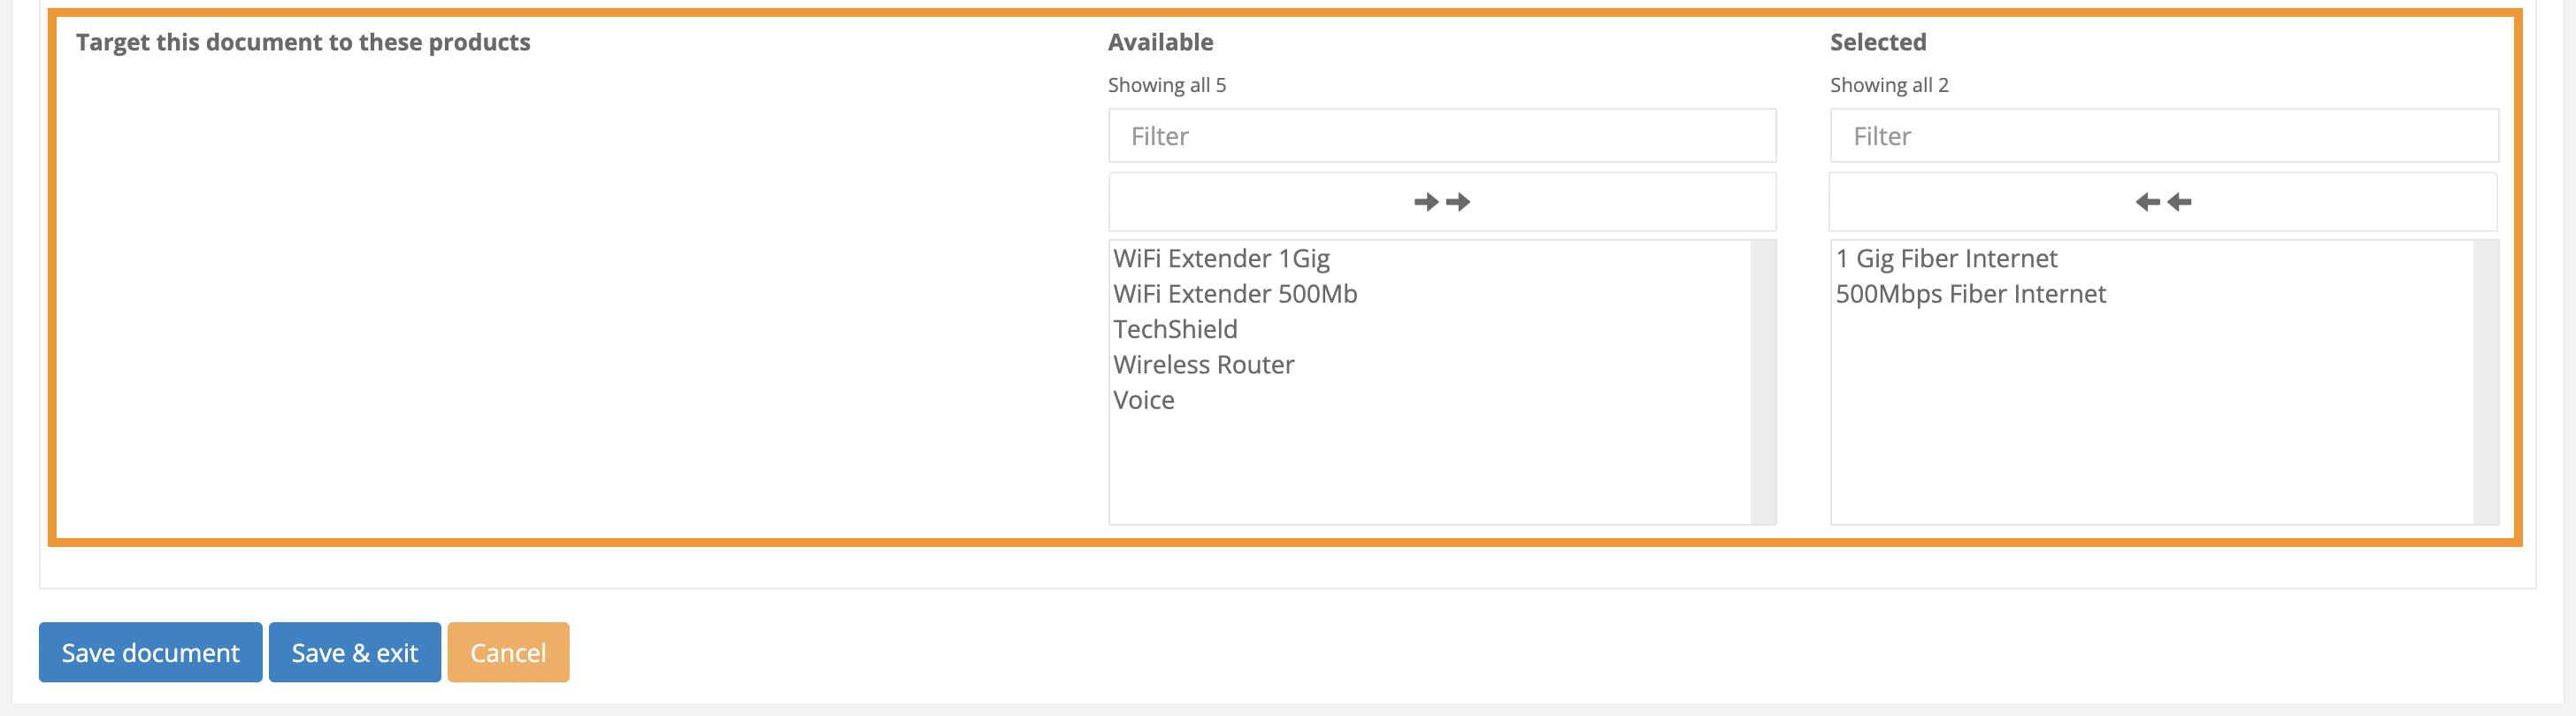
Target this Document to these Products
-
Create exclusive documents for your registrants based on the services they purchased in your CrowdFiber eCommerce experience.
-
Documents can be exclusive to a specific product purchased or be created for a specific selection of products being purchased. This setting defines which product(s) a registrant must purchase for this document to be created and delivered to a registrant.
- One product
- Multiple products
The products that the registrant must purchase to be eligible for this document are seen in the Selected Column. Click a product name to add or subtract a zone from the Available or Selected column.
-
-
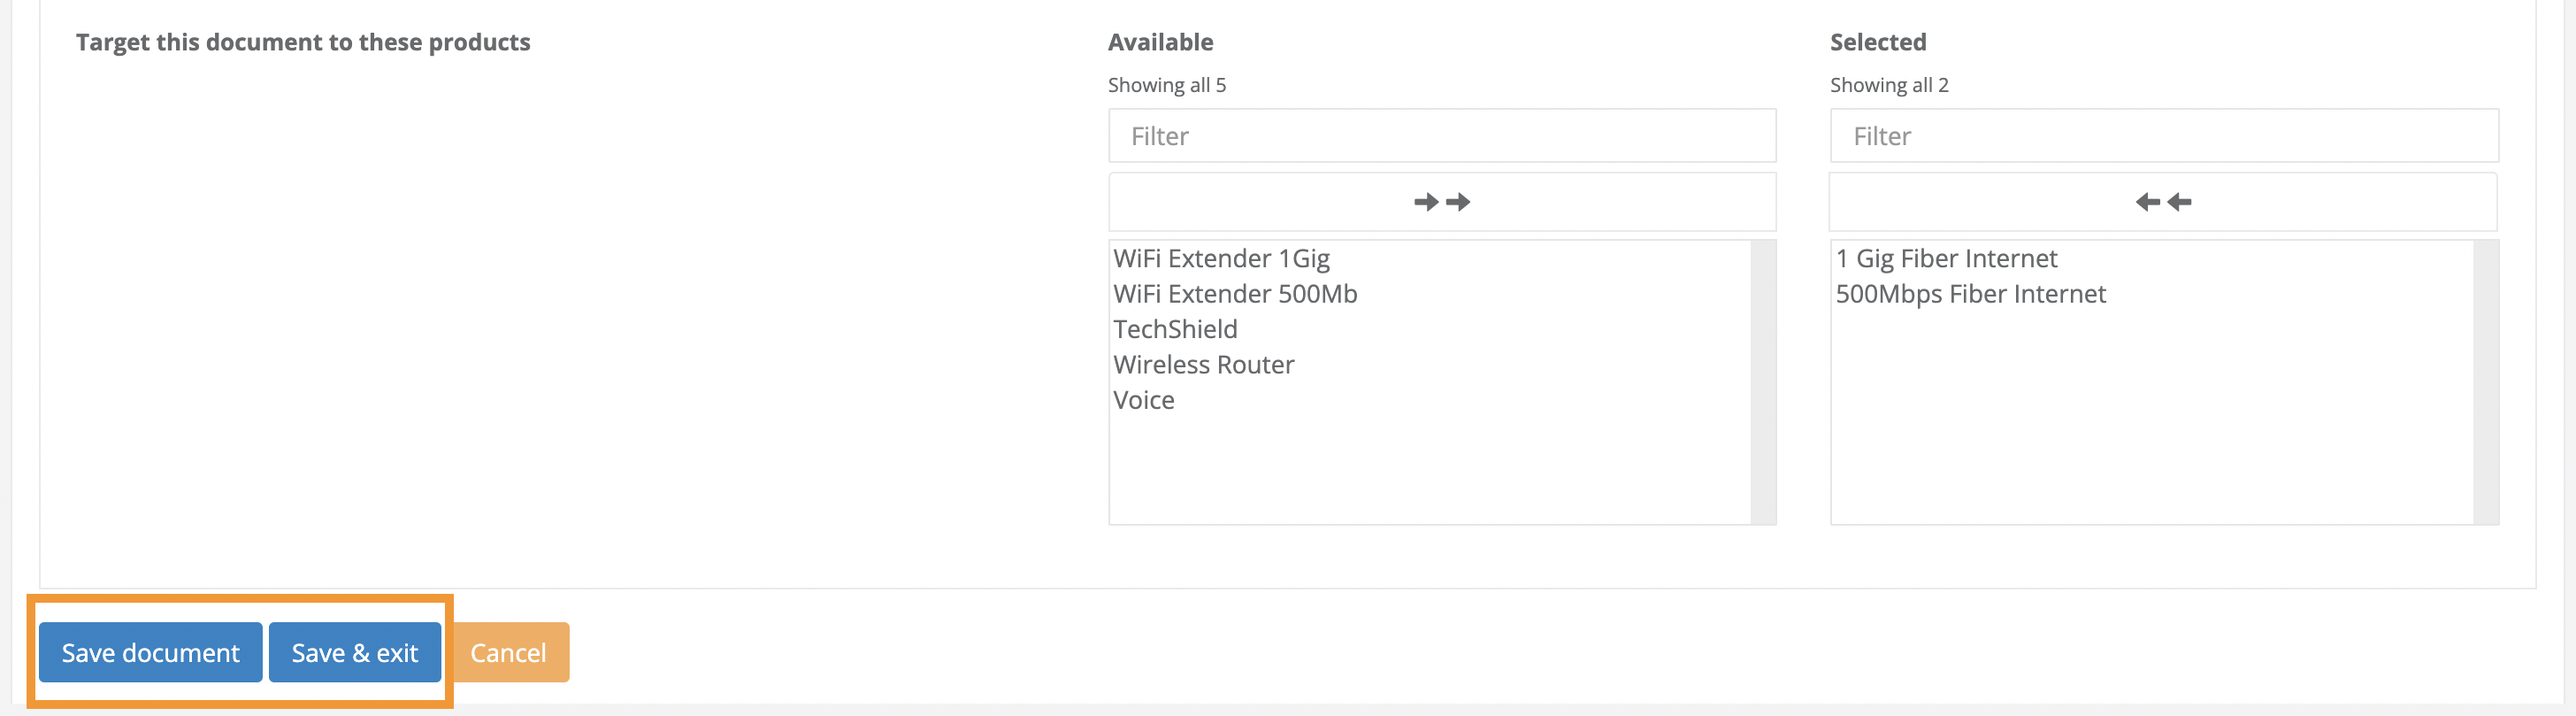
Part 7) Save Your Document Settings
Save and activate your document. Once you have saved your document, your document is live; its delivery will be automated to the next registrant who meets all of the document's targeting requirements.
- Click one of the blue Save buttons seen in the lower left-hand corner of your screen to save and activate your document.
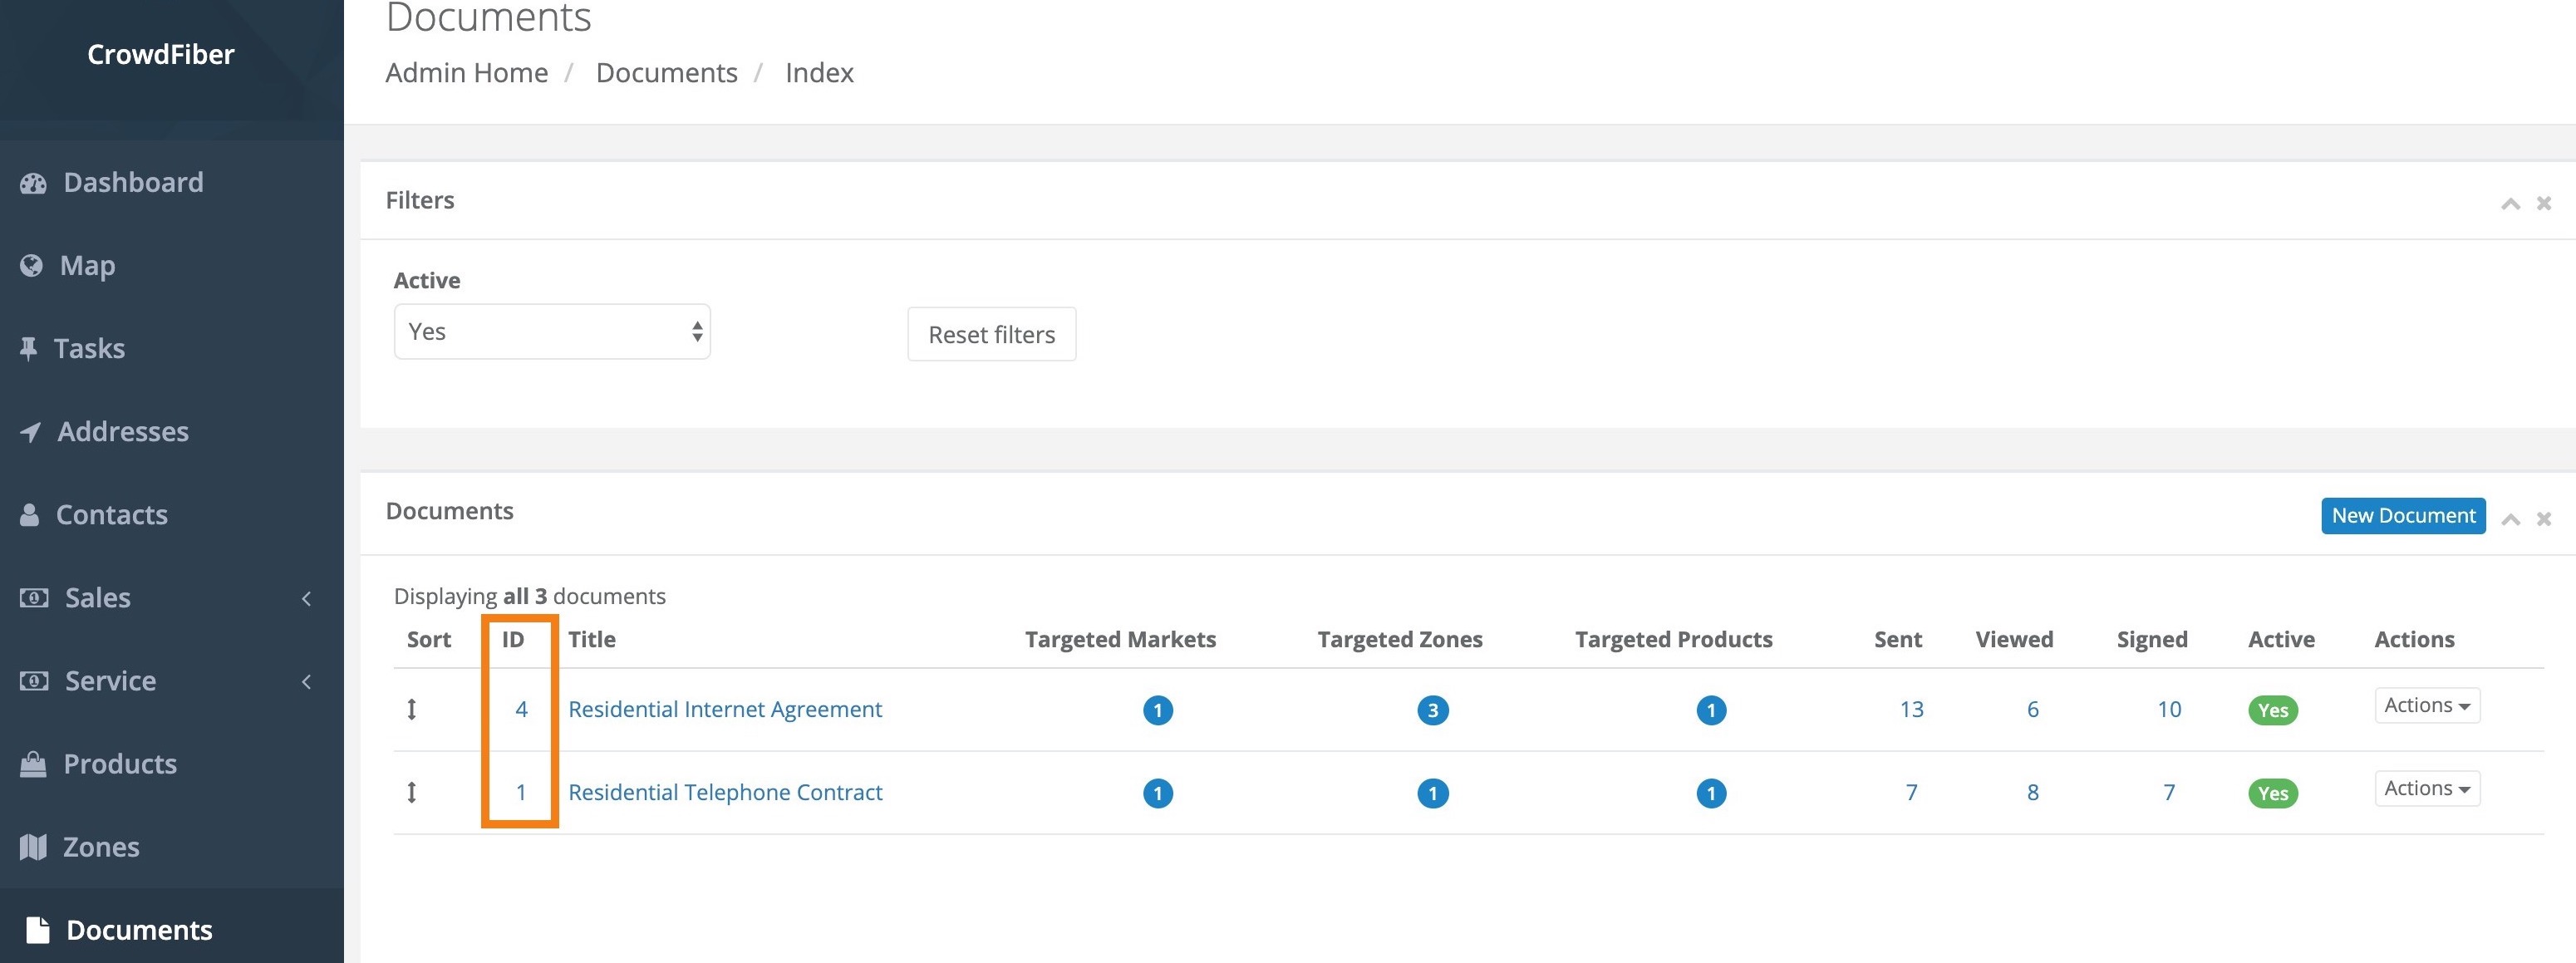
How to Prevent The Delivery of a Document/How to Deactivate a Document
- If you are not ready to automate the delivery of your document at this time, you need to deactivate your document. Here's how:
- On your Documents page, locate the document you would like to deactivate.
-
Click the Document ID located in the far left-hand column of the row containing the document you would like to deactivate.
-
On the following Document page, set the This document is active slider to Off.
-
Click the blue Save Document button located in the lower left-hand corner of the Documents Page to complete and save the deactivation of your document.
How to Reactivate a Document
You'll need to activate your documents in order to automate their delivery. Only active documents can be automated.
- On your Documents page, locate the document that you would like to activate.
- Click the Document ID located in the far left-hand column of the row containing the document you would like to activate.
- On the following Document page, set the This document is active slider to On.
- Scroll down to the bottom of the Document page and click one of the blue Save Document buttons located in the lower left-hand corner of the Documents Page to complete the reactivation of your document.